Goal of EMDACC4
The goal of the EMDACC4 device is to provide students with a practical tool to explore how digital technologies can contribute to sustainability and climate change awareness. By combining a central hub with modular sensor boards, the device allows learners to measure environmental variables such as temperature, light, motion, and energy use, and to program meaningful responses to these inputs.
Its purpose is not only to support the development of technical skills in programming, electronics, and design, but also to encourage students to think critically about energy conservation and smart environments. In this way, the device serves as both a learning platform and a means of fostering responsible attitudes toward the use of technology in everyday life.
Modular design and ideas
For the design of EMDACC4, we began by reflecting on the values and goals set by the project. We wanted the device to be modular, so that it would save on spare parts, plastic, and costs. We wanted it to include a variety of sensors, giving students the chance to explore and measure many different aspects of everyday life. Just as importantly, we wanted it to be easy and enjoyable to program, so that students could quickly see the impact of their work.
With these ideas in mind, we decided to build on an existing, well-known, and playful platform: the Micro:bit. Around this core board, we created a custom ecosystem of sensors and code, designed to make the experience both straightforward and rewarding for learners.
Micro:bit as a foundation
The Micro:bit is a small, open-source microcontroller board created to inspire digital creativity and teach coding skills. It was designed to make programming and electronics accessible for students through hands-on projects.
This board features an ARM processor (64 MHz), 512 KB Flash memory, and 128 KB RAM. It includes a 5×5 LED matrix, two programmable buttons, a speaker for audio output and a large amount of built-in sensors: accelerometer, magnetometer, microphone, temperature, light and touch. It can be powered via USB or battery pack.
On the software side, the micro:bit supports multiple programming environments: MakeCode (block-based programming), Python and many others for advanced users. Programs are written on the web, compiled into a .UF2 file, and transferred to the device via USB, making the process simple and beginner-friendly.
Toward a new platform
In order to adapt the Micro:bit platform to the needs of the EMDACC4 project, we introduced a set of customizations that extend its capabilities while keeping it simple and accessible for students. Our goal was to make a device that could gather useful environmental data, broadcast it reliably, and allow students to focus on the creative part of programming responses, without being overwhelmed by the complexity of low-level sensor integration.
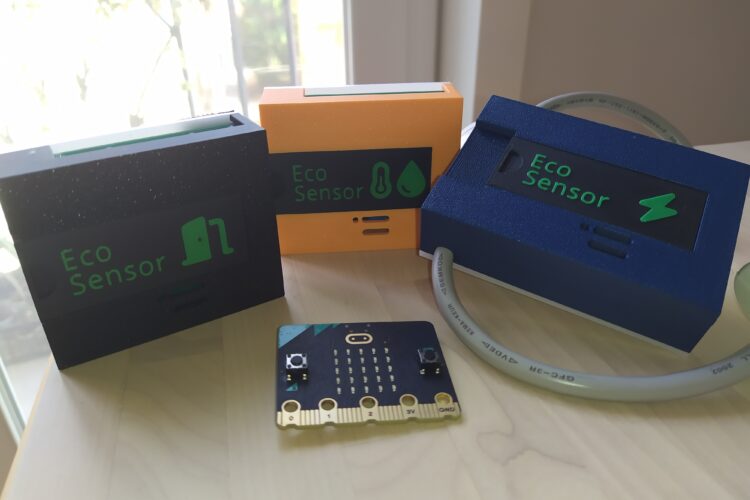
On the hardware side, we designed three dedicated extension boards to which a Micro:bit can be attached. Each board enables a different type of measurement. One integrates a DHT11 sensor for temperature and humidity readings, making it possible to monitor basic indoor climate conditions. Another uses current readers to estimate the electricity consumption of an appliance, providing a direct link between digital experimentation and real-world energy use. A third board supports a magnet sensor, which is particularly useful for detecting the state of doors or windows—simple, concrete scenarios that students can immediately relate to. By keeping these functions separate, the boards maintain a modular structure: only the relevant board needs to be connected,making the system adaptable to different learning situations.
On the software side, we developed a custom firmware for the central device. This firmware is designed to automatically detect, at startup, which of the extension boards is attached. Once recognized, it loads the appropriate routines to initialize the corresponding sensor and begins collecting data. The data is then broadcast continuously over the Micro:bit’s built-in radio channel, which provides a stable and familiar way to share information across devices. In this way, the central unit handles all the background complexity of communication and sensor management.
The advantage of this setup is that students can focus entirely on the peripheral Micro:bits, which receive the data and are fully programmable by them. Their task is to decide how the system should react: turning off a light when no motion is detected, raising an alert when a window is left open, or experimenting with new ideas that connect sensor inputs to real-world actions. By separating the technical management of sensors from the creative programming of behaviors, the device lowers the entry barrier for learners, while still giving them authentic control over meaningful applications.
Through these customizations, the Micro:bit becomes the core of a new ecosystem: familiar, approachable, and playful, yet enriched with new functions tailored to the project’s goals. The result is a custom product that bridges the gap between classroom learning and practical energy-awareness, while staying true to the spirit of experimentation and discovery that drives the maker approach.
The two-role model
Within the EMDACC4 system, the boards take on two complementary roles: that of the central device and that of the peripherals. The central device acts as a dedicated data collector. Its responsibility is strictly limited to reading sensor values and broadcasting them over the radio channel. It does not perform logical operations or take decisions; instead, it provides a continuous, reliable stream of environmental information. By isolating this role, the central unit becomes a stable “black box” that guarantees the availability of accurate data while hiding the technical complexity of sensor management.
The peripherals, in contrast, are the space where students can fully exercise creativity and problem-solving skills. Each peripheral receives the data broadcast by the central unit and can be programmed to interpret and react to it in different ways. Here, the emphasis is on student-driven logic: deciding what constitutes an event worth responding to, and designing how the response should look. In practice, this may involve using the Micro:bit’s built-in actuators, such as LEDs and buzzers, to signal a change, or extending functionality by connecting additional components approved by their teacher. Students might choose to simply visualize the incoming data on the device’s display, or they could go further by programming behaviors such as alarms, reminders, or energy-saving actions.
In this way the central unit guarantees that the system always provides consistent input, while the peripherals offer a safe and flexible environment for experimentation. By separating “data acquisition” from “response design,” the system allows learners to focus on higher-level programming challenges without needing to handle the lower-level details of sensor communication. At the same time, the structure reflects real-world IoT architectures, where dedicated sensing devices provide data streams that are then processed and acted upon by other systems. In this way, the roles of the boards help students not only to learn technical skills, but also to understand how digital systems are organized in practice.
Programming
When a student starts working with the EMDACC4 system, they do not need to worry about the central device, since it already takes care of reading the sensors and broadcasting the data. Their task is to program one of the peripheral Micro:bits so that it listens to the incoming data and reacts in some way. To do this, the student uses the MakeCode platform, which runs directly in a web browser.
In MakeCode, the student builds programs by dragging and connecting colorful blocks instead of writing long lines of text. Each block represents a command or a piece of logic, and the blocks fit together like puzzle pieces. This makes it easy to see how the program is structured and to experiment with different ideas.
The first step for the student is to place the on radio received block. This block tells the Micro:bit what to do whenever new data arrives. For example, the student might drag in a block that shows the received number on the LED display. This way, they can immediately see the temperature or humidity being measured by the central unit.
Once this works, the student can begin adding conditions to create more interesting behaviors. For instance, they might decide: if the temperature is greater than 25, then play a buzzer sound; otherwise, show a happy face on the screen. With just a few blocks, they can create programs that respond in meaningful ways to the environment.
Over time, students can expand these programs by combining more blocks: timers, animations, messages, or even extra components like lights and buzzers. The important part is that they are always working with real data from the sensors, and they decide how the system should respond. This makes programming both concrete and rewarding, since they can see the results of their code in the classroom around them.
Board
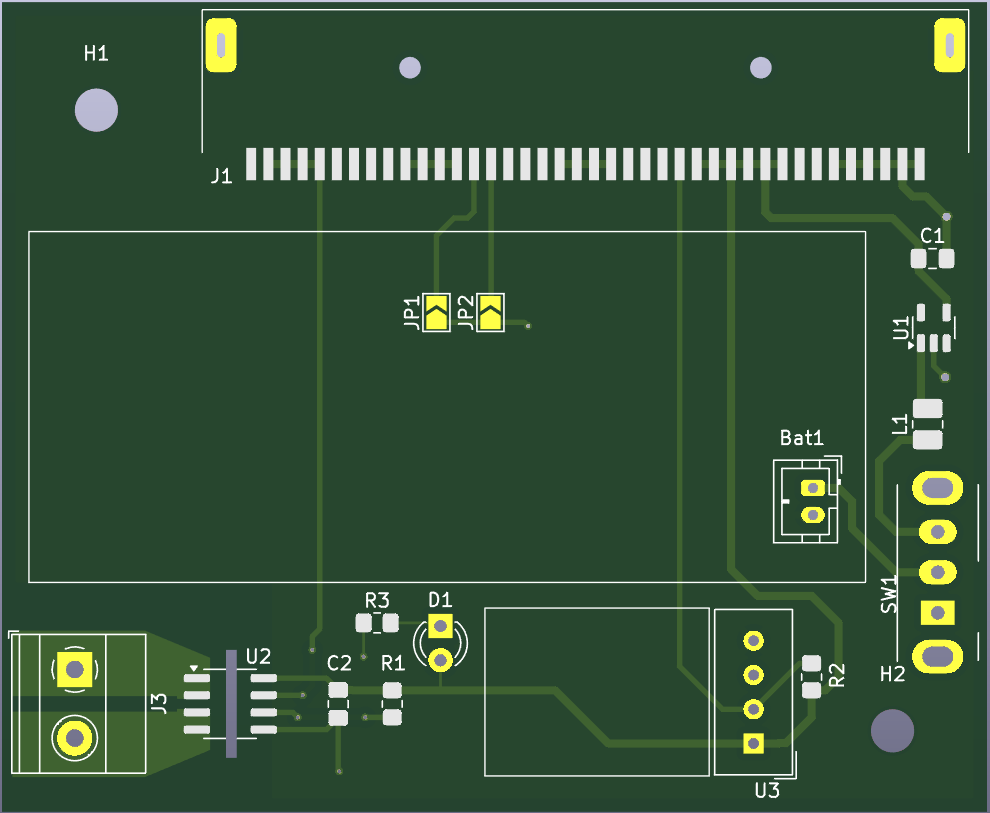
The EMDACC4 project includes a custom PCB (Printed Circuit Board) that serves as the backbone of the device. A PCB is a flat board, usually green, that connects electronic components through thin copper tracks instead of wires. For this project, the board was first designed with an open source software called KiCad starting from a schematic, then manufactured using industrial processes that etch copper, apply a protective mask, and add printed labels. The result is a compact and reliable platform that organizes all components neatly, making the device easier to use and less prone to connection issues.
This is what the board looks like inside the software:
This is how it looks once manufactured and with the components soldered:
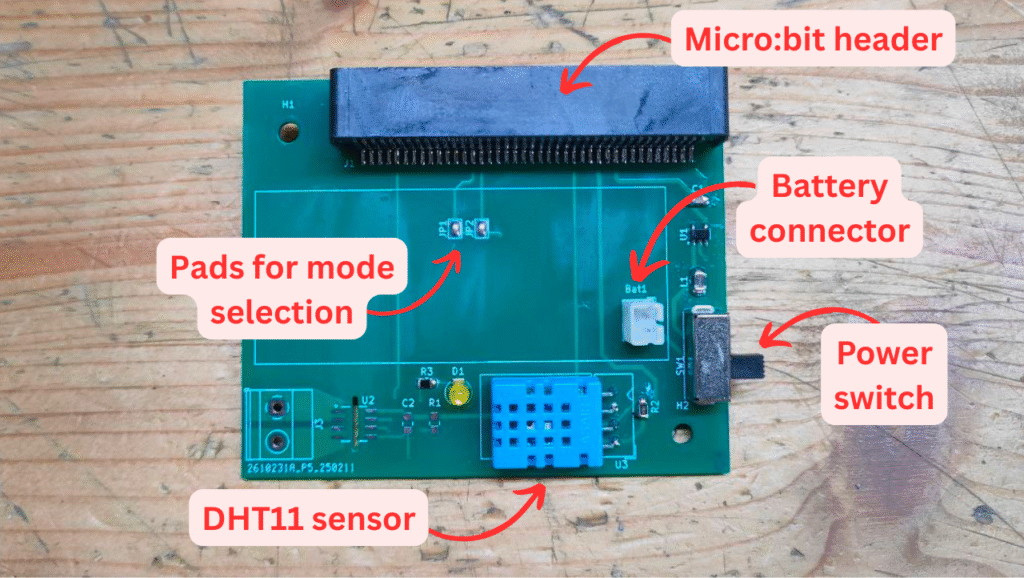
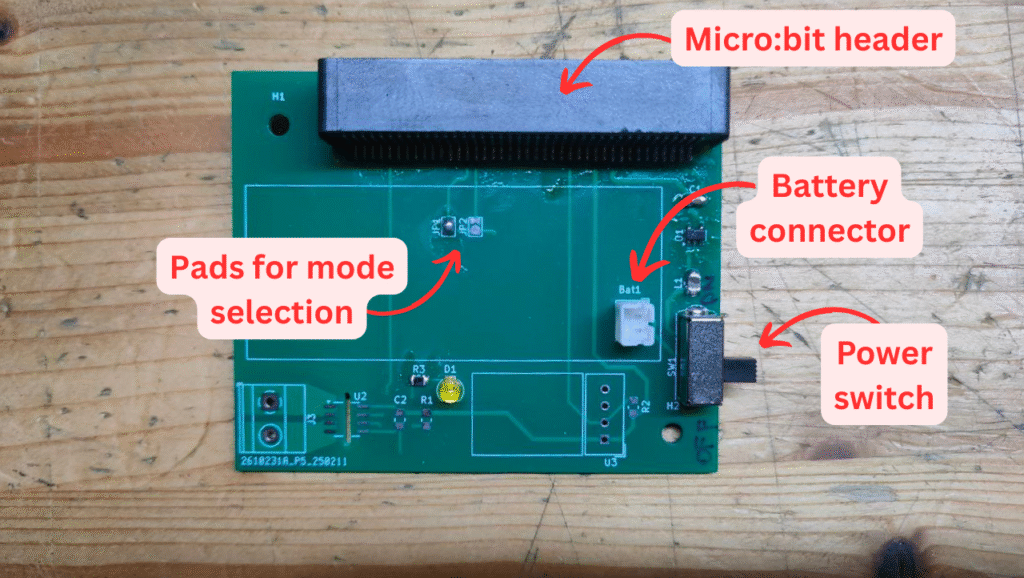
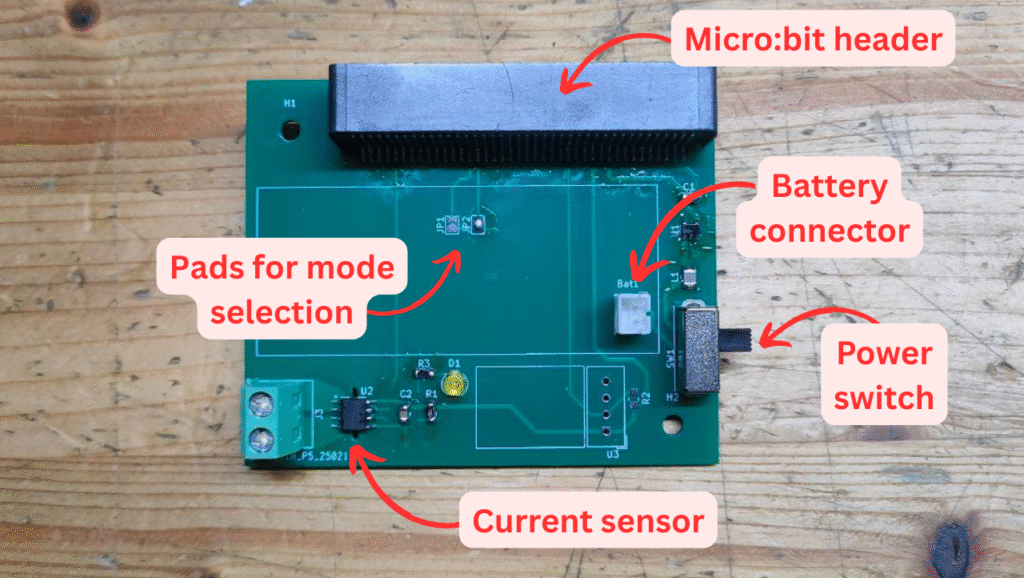
During assembly, the board must be configured to work with the chosen sensor. The configuration is done by appropriately soldering these pads. In this case, it was configured to work with the temperature and humidity sensor (DHT11).
To support both design and reproduction, the KiCad project files and Gerber files (compatible with all PCB manufacturers) are available.
Once assembled, the circuit is placed inside a 3D-printed case, which comes in slightly different shapes depending on the mounted sensor. The necessary files for printing the case are also provided.
Getting Started
To begin working with the EMDACC4 system, the class is divided into small groups. Each group receives one Micro:bit that will act as a peripheral, while an additional Micro:bit is set aside to serve as the central device. The central unit is attached to one of the sensor boards, depending on what data will be collected during the activity.
Before use, the central Micro:bit needs to be prepared by loading the latest available firmware. This firmware allows the device to recognize the connected board and broadcast the corresponding sensor data automatically.
To install the firmware, connect a Micro:bit to a computer, a drive called “MICROBIT” will appear. Copy this file on the drive and, after some seconds, it will reboot and emit a sound when it is ready. Once the firmware is installed, the central device will be attached to one of the modules and will be simply turned on and left running. From that moment on, it will continuously send out data that the groups can receive.
Each group then starts by writing a simple test program for their peripheral Micro:bit. The goal of this first program is only to check whether the setup is working correctly and you can find its description in the first Activity Sheet.
After this initial test, every group moves on to the main activity: programming their peripheral to achieve the given task. This could involve setting conditions, triggering responses with LEDs or buzzers, or experimenting with more creative behaviors. From this point, the groups have full freedom to shape their program around the project’s objectives.
Resources
- Latest available firmware (v1.9)
- Activity 1 – Plotting sensor’s data (Other versions: German 🇩🇪️, Italian 🇮🇹️, Polish 🇵🇱️, Portuguese 🇵🇹️, Spanish 🇪🇸️, Turkish 🇹🇷️)
- Activity 2 – Open window detector (Other versions: German 🇩🇪️, Italian 🇮🇹️, Polish 🇵🇱️, Portuguese 🇵🇹️, Spanish 🇪🇸️, Turkish 🇹🇷️)
- Activity 3 – Energy monitoring (Other versions: German 🇩🇪️, Italian 🇮🇹️, Polish 🇵🇱️, Portuguese 🇵🇹️, Spanish 🇪🇸️, Turkish 🇹🇷️)
- Activity 4 – Multi-sensor temperature (Other versions: German 🇩🇪️, Italian 🇮🇹️, Polish 🇵🇱️, Portuguese 🇵🇹️, Spanish 🇪🇸️, Turkish 🇹🇷️)